Tuesday, January 24, 2012

Juicing with the Champ

A hundred years ago, my family generously gave me a Champion juicer for my birthday. It was our Dad's idea, which was weird, since he almost always gave us cards with pictures of kitties in a basket on the front, with five twenty dollar bills inside. I saved a whole bunch of those cards (but not the money), and one of them reads: Love, Joe. The Champion juicer -- The Champ -- was the most thoughtful material gift he ever gave me. His reasoning: I was spending too much money on carrot juice from the grocery store. Might as well make it myself.

The Champ
Sentiment aside, I recently dusted off the old juicer and, for the past few weeks, I've been murdering bags of carrots, keeping mutant hands of ginger in the fridge, and experimenting with weird combinations of fruits, veggies, and herbs. It's true what they say on those late-night Jack LaLanne infomercials: juicing is good for you, and makes you feel great. I don't know if it's the concentration of vitamins, or what, but I'm feeling energetic and downright nourished these days.

There's nothing that bores me more than a drink recipe, especially if it doesn't contain vodka, but I'm going to share my favorite juice recipe, regardless:  5 or 6 carrots, 2 chard leaves, a tart apple or two, a tiny piece of ginger, and a handful of cilantro.

Like a rainbow for your belly


I made something last night which I named "The Bottom Drawer"; it contained almost every fruit and vegetable in my fridge: all of the above, minus the chard, plus 1 bosc pear,  a beet, some kale, and celery. I went way overboard on the ginger, which can ruin an otherwise perfectly good glass of juice. The unfortunate part of this experiment was that I drank one pint of the juice and still had a pint left over, which I bottled and saved for today. I think Whole Foods offers something similar at their juice & coffee bar, appropriately called The Oil Changer. It wasn't my best effort, but it wasn't terrible, either. Plus, it was so darned good for me, how can I complain?

After The Champ does its thing, separating the juice from the pulp, I like to put my juice through a strainer. Some people probably like the sludgy stuff at the bottom, but I think it's gross. (Side note: I've been keeping the pulp to make raw veggie crackers in the dehydrator, and now I have a kazillion crackers. They're not bad!).

Bottom Drawer
As much as I hate keeping small appliances on the kitchen counter, The Champ has found a new spot near the sink, where I'll use it more often. Juicing makes a mess, and the clean-up almost doesn't seem worth the effort, but I'm going to stick to it, anyway. Who knows, someday, I just might juice a potato and figure out how to make my own vodka. For now, I'll just have a Bottom Drawer.

Thursday, January 19, 2012

Ladle, ladle, ladle. . . .

You sure you don't want one, Sissy?! They have 2 sizes!!
Erin has been looking for a simple old-school ladle, the regular stainless kind with a hook at the end of the handle. Wm Sonoma doesn't carry one, which is shocking and sad, because I was willing to shell out $22 for one for her at Christmas, when I was feeling reckless with my money. Alas, she's still ladling her soup with a measuring cup. Personally, I like to use a teacup. To my great surprise, I found a hundred of them in different sizes yesterday at Kitchen Kaboodle, here in Portland, where I was shopping for a spiral slicer, so I can make raw vegetable spaghetti. They didn't have the spiral slicer, but they did have these. I think they were about $7. >>>

Kale Salad


Been making this again lately. I've tried for years to copy the kale salad at WFM, but I never get it quite right. This one was close. Of course, I was just tossing stuff in a bowl, so I don't know the measurements, but you can wing it. I tear the kale into fairly small pieces, then wash it in hot water for a minute, to wilt it ever so slightly. It just makes it more appetizing, and easier to eat. Alternately, you can toss the kale with the dressing and let it sit in the fridge for a day, and it will wilt a little. Raw kale can be tough to chew and digest.

Kale
Arame seaweed, soaked in hot water for 10 minutes
Ginger, grated
Garlic, grated
Seasoned rice vinegar
Olive oil
Tamari
Currants or raisins
Sesame seeds

Spin-dry the greens. Mix the liquids and spices together, and toss with the kale, seaweed, sesame seeds, and currants. Let it sit for an hour or so, for best flavor. Enjoy!
Seaweed, kale, raisins, dressing

Mix it all together - voila!
Leftovers - yum. Even better the next day.

The Bread

Erin, I like the idea of making sourdough, per your previous post, but there's all that waiting involved. So, my friend Doug, who lives in New Hampshire, and I both make this 5 minute artisan bread on a regular basis. One of us found the recipe in the NY Times (probably Doug), and now we make it constantly and text each other pictures of our loaves-in-progress. It came from some book by some bakery people -- I don't know. Doug can tell you. The most important thing to know is how to make it, which is super easy, which is why we like it so much. I made the best loaf I've ever made a couple of days ago, and I've still got about 2 loaves worth of dough left. This is not it, but this one was pretty:
Sometimes, my dough is so awesome, it looks like art.
It's the easiest thing on Earth to make; here's what you do:

Take 3 C warm water and 1 1/2 Tablespoons of yeast and put them in a big bowl. I wait a few minutes for it to foam up, but you don't need to. Lately, I've been using Bob's Red Mill active yeast, which I find in the refrigerated section near the tofu at Whole Foods. Good yeast makes the difference, in my opinion.

Add 1 1/2 Tablespoons of Kosher salt.

Add 6 1/2 C flour. Doug and I agree that half white, half whole wheat makes better bread than 100% of one or the other. Just dump it in the bowl and stir until it's all mixed together. You're done. No kneading involved. It's Lazy People Bread.

Gather the dough into a ball, let it sit around for a couple of hours, then stick it in the fridge, or cut off a 1/3 of it and make a loaf right away.

Form your dough into a nice round loaf, dust it with flour, score the top, put it on a peel or a pan dusted with cornmeal, and let it rise for 40 minutes. Put it in a preheated 450 oven for 30 minutes with a couple of ramekins filled with water (or pour water in your broiler pan), to create steam, which gives the bread a nice chewy crust. Ta da! Bread! Sometimes I throw in a handful of walnuts, which makes it insanely delicious.

This is the Cliff's Notes version I keep posted near the oven. I'm thinking about editing it down to one post-it note:


Sunday, January 15, 2012

Starting Sourdough

Franny was recently asking me about sourdough starter wondering if she made it in Portland would it be different than San Francisco sourdough.  Technically, the answer is yes.  Apparently during the Gold Rush era, the Boudins, a French family of bakers, settled in San Francisco and discovered that the sourdough they made in San Francisco was especially unique so they set about baking... and raking in the cash.

I've seen some very complicated recipes for sourdough starter, but it's actually very simple. Here's my method:

Make your starter at least 3 days before you intend to bake with it.  The following recipe is for a gluten-free sourdough starter, made from rice flour, which helps enormously with getting gluten-free breads to rise properly.  One can substitute bean, wheat or rye flours for the rice flour, if desired.

Sourdough Starter
2 1/2 tsp dry yeast granules
1 cup lukewarm water
1 tsp potato (instant flakes, potato flour, or cooked russet)
1 tsp sugar
1 cup rice flour

The sugar feeds the yeast so don't leave it out, but you can substitute a few crushed grapes if you prefer.  You can probably get away with leaving out the potato flour, if you don't have it.

In a glass jar or potter crock (no metals!) mix the potato into the water, then dissolve the yeast into it.  Put the lid on and shake to mix.  Add the sugar and the rice flour, cover and shake again.  Take the lid off and stir whatever hasn't mixed thoroughly from the shaking then, leaving the lid off, cover with a paper towel and leave the starter sitting on your kitchen counter for at least 3 days, stirring occasionally.  Over time, it will start to bubble and give off a pungent fragrance - this is the good stuff! (Take out the grapes at this point, if you used them).  The longer you leave it, the more flavor it will impart.  A layer of liquid will eventually form on top so be sure to stir it well before you use it.  I add 1/2 cup to any bread recipe I make - it adds great flavor and helps the loaf rise up nice and fluffy.

Replenish the starter after each use by adding 1 cup of lukewarm water for every 1 1/2 cups of rice flour, or variations on that ratio as needed.

Store in the refrigerator indefinitely.

Superloaf!
Note from Franny: Erin, I got your sourdough starter in the mail, along with all those gorgeous Meyer lemons, and everything else you sent. You're the best!

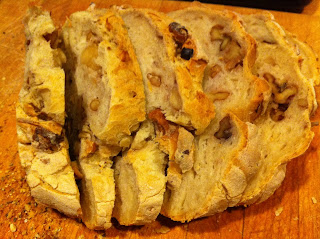
So, I made my 5 minute artisan bread last night and, as sort of an afterthought, I tossed in most of your sourdough starter. I don't know what I was thinking, adding all that extra yeast, but it came out great! Since you need a source of steam to create the nice crust -- and I'm always trying to figure out the best way to make more steam -- I placed a small cast iron pan filled with water on the floor of the oven. I also added walnuts, and the result was a wonderful, chewy loaf of bread. It's really quite remarkable, if I do say so myself. It seems as though each loaf is better than the last. Here's a picture of  my latest masterpiece >>>

While I was baking, I watched an Ashton Kutcher movie on my computer in the kitchen (the one where he and Natalie Portman are friends-with-benefits trying hard not to fall in love with each other -- No Strings Attached). It was truly terrible.


Tuesday, January 10, 2012

Soup Made Simple

I love Mark Bittman, the food writer for the New York Times.  Last winter he wrote an article simplifying the soup-making process - specifically for vegetable soups.  To summarize, there are 4 basic vegetable soups; everything else is a variation of one of the four:  Creamy, Brothy (quick-cooking), Earthy (bean soups), or Hearty (sauteed veggie base).

From the Earthy category, I made his basic bean soup, then pureed it in the blender and topped it with chives.  The beans, chives, thyme and bay leaf I used were all grown in my garden last summer and my version of the recipe goes like this:

1 cup dried white pole beans
1/2 onion, chopped
2 carrots, chopped
2 ribs of celery, chopped
6 cups of vegetable stock
1 bay leaf
a handful of thyme sprigs
2 Tbsp chopped chives
olive oil
salt and pepper

Saute the onion, carrots and celery in a little bit of olive oil on low to medium heat.  Sprinkle with salt and cover for a few minutes until their juices start to flow.  Add the rest of the ingredients, except for the chives, and bring to a boil.  Reduce the heat and simmer for 1 1/2 hours or until the beans are done.  Allow to cool for 15 minutes, fish out the thyme stems and the bay leaf, and blend the soup in the blender.  Return to the pot, add salt and pepper to taste, and top with chopped chives.  Yummy!


And, here's the recipe for the BROCCOLI-CHEEZ SOUP I made last week:

2 large bunches of broccoli
3 carrots, chopped
2 ribs of celery, chopped
1 onion, chopped
3 cloves of garlic, chopped
8 cups of vegetable stock, or enough to cover the ingredients in the pot
1+ cup nutritional yeast
1+ Tbsp yellow mustard (regular mustard, not dried)
olive oil
salt and cayenne pepper

Sautee the carrots, celery and onion in a large pot, with salt, until soft.  Add remaining ingredients and bring to a boil.  Reduce heat and simmer until broccoli and carrots are cooked through.  Allow to cool for 15 minutes, blend in the blender and return to pot.  Season to taste.

Sue's Chickens


Yesterday afternoon I went to see Sue at her new house in Santa Rosa.  She has a huge backyard and she and Steve have turned it into a little farm, including 6 chickens - 2 each of 3 different varieties.  They've built a little coop for the birds, from a dog house, and enclosed it in a large cage to keep out the predators.  During the day, the flock is allowed to run around the garden, which was recently fenced off when Sue and Steve got tired of chasing hens off the cabbage plants (there will be very little coleslaw this summer!).  Sue and I drank wine and watched the girls run around the yard, mostly chasing off the scrub jays and other little birds who dared to land in their enclosure.  It's hilarious to watch the whole flock chasing one little bird.  Allegedly, they all have names, although Sue can't tell some of them apart.  I do know that the golden puffy-cheeked one is named Nutmeg Princess Leia.

Kale Chips


Erin and I both love the Kale Chips from Whole Foods. My friend Biz turned me on to them a few years ago, and we have been talking about making them forever. Since Erin bought me a Nesco dehydrator for Christmas, and kale was on special at the WF for $1.50 a bunch, I decided to give it a go. After cleaning one and a half bunches of kale and tearing it into chip size pieces, I tossed it with a jar of NACHEEZ, a vegan nacho sauce (made by a friend of a friend of my sister), sprinkled it with nutritional yeast, and popped it onto 4 dehydrator trays. I set the dehydrator at 115, and let it do its thing for about 7 hours. Delicious.

Home for the Holidays


Recently, I spent 10 days back home in Marin with my sister and Mom for the holidays. It is a rare occasion when Erin and I have that much time off from our jobs and otherwise busy schedules, so it was a real treat. She dragged me out most mornings on her daily walk, and often for another in the afternoon. Here is a photo I took on one of our walks of my favorite oak tree. I love this tree and take pictures of it often. If this old oak had a brain, it would know my affection for it is almost creepy. I wonder how we can find out how old it is. It's a really good tree.